Step 3 Add the new Wind Sound
Previous  Top  Next

At the main program window, load the Plane/Sound combination just created. It will be listed in the Open Aircraft dialog with the Title you supplied in the Add New Sounds Wizard, Step 4, the Sound Name you supplied in Step 5, and the UI Variation entered in Step 6.

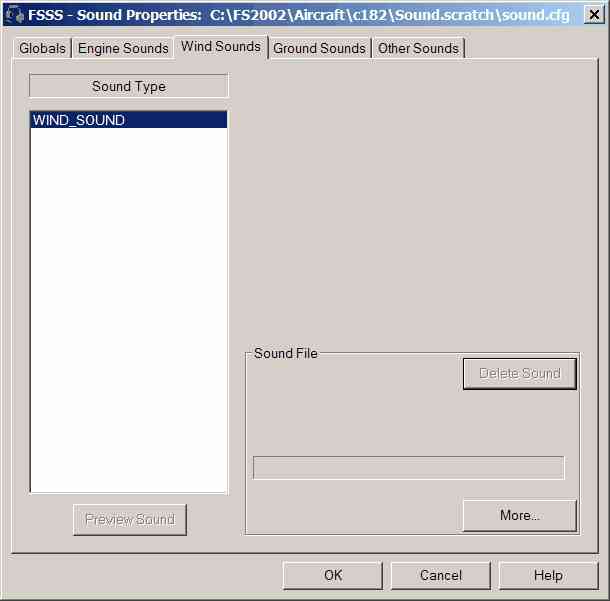
Once the Aircraft is loaded, select the File: Edit menu pick (or the corresponding Toolbar button).

clip0055


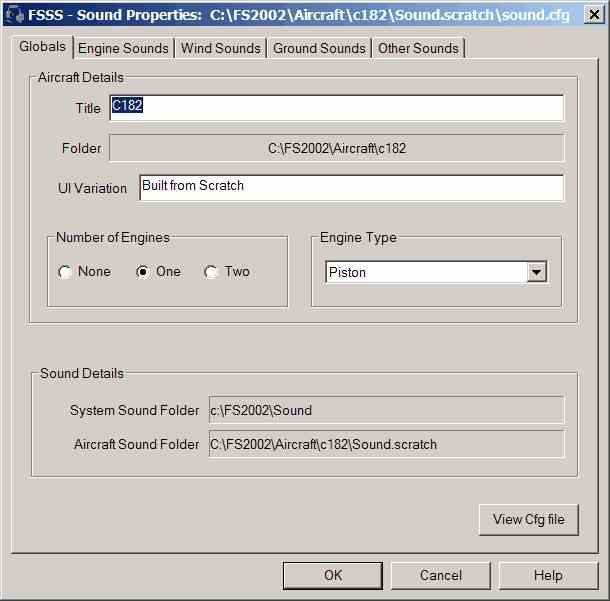
In our example, we've set the Title to C182, the UI Variation to Built from Scratch, and the Sound Name to Sound.scratch. FS Sound Studio has set the Number and Type of engines for us to 1 and Piston. Note under Sound Details
that our files will be stored in the C:\FS2002\Aircraft\c182\Sound.scratch folder on disk.


Step 3.1 Open the Wind Editor

We'll start be setting up WIND_SOUND. Click on the Wind Sounds tab to bring up the editor for wind related sound.

clip0056


The Sound File
entry is blank, as there is no file defined. Let's create one now. Click on the More... button to bring up this sound's properties.


Step 3.2 Setup our new Wind Sound.


clip0057


Again, there is no entry for the Raw File
which will be played for this sound. Click on the Browse button, navigate to the folder in which you unzipped the demo files, and locate the wind.wav file.


clip0058


When you click on the Open
button, FS Sound Studio will check the Path of this file. If it's not in the Sound.scratch folder, you'll see the following message:


clip0059


Click on Yes
and FS Sound Studio will copy the wave file to the proper location.


We've now set the Raw File
for this sound. If you were to Preview this sound, it would sound the same at all airspeeds in FS2002 - not very realistic. We'll use the Speed, Rate and Volume Parameters to fix this. In the Sound Properties - wind_sound dialog, set the Min Speed to 30 (knots), the Max Speed to 180 (redline for this Aircraft). Set the Minimum Rate to 0.70, the Maximum Rate to 1.20, the Minimum Volume to approx 7000, and the Maximum Volume to 10000 (max).

These are just initial guesses. We'll use the Preview capabilities of FS Sound Studio to fine tune them.


clip0060


Your dialog should now look like this. Click OK
to save your changes.


Step 3.2 Setup our new Wind Sound.

We've now associated the wind.wav file with wind sound in FS2002. We can now use the Preview capabilities of FS Sound Studio to determine what it will sound like in FS2002, and fine tune it for maximum realism.

We should now be back to the Editor's Wind page, as shown in Step 3.1 Click on the Preview Sound
button.


clip0061


The Sound Preview
dialog allows us to play the sound, and hear it as modified by the Parameters we set in the last step. This allows us to hear the Sound as it would be played in FS2002. Click on the VCR style Play button.

Unless your computers's volume control is set very high, you probably won't hear anything. Slide the Airspeed
slider control through its range and you should now hear the sound grow louder with increasing simulated Airspeed. Note that the sound increases in Pitch as well as Volume. FS Sound Studio shows the calculated Rate and Volume for the Simulated Airspeed, so you can see what the actual values will be for any specific speed.

If you're not satisfied with the sound, you can go back to the Properties dialog, and modify the Speed, Rate and Volume values, and then resimulate. This is a fast and easy way to get the exact effect you're looking for. If you don't like the basic sound of the wind.wav file, feel free to explore the wave files provided by FS2002, or other Aircraft's files to select a different sound. FS Sound Studio will ensure the file ends up in the proper folder, and will preview it for you so you can hear it as it will sound in FS2002.

When you're happy with the final result, click on the OK
button.